

Injection Molding Defects
By Mark Haynie and Joshua Belisle · Edited by Dana Gardner
Published May 12, 2026 · Reviewed by Mark Haynie · July 27, 2026

Summary
What causes splay and other common injection molding defects?
Many common injection molding defects trace back to moisture left in the resin. Splay, brittleness, warpage and dimensional drift, and some contamination often come from inadequate drying, whether from resin that arrived wetter than expected, a cold upper hopper, low airflow, or degraded desiccant. Sink marks, flash, short shots and burn marks are more often tooling, cooling or process problems.
What Are the Most Common Injection Molding Defects — and What Causes Them?
If you’ve spent any time in a plastics processing operation, you already know the feeling. The mold opens, parts eject, and something’s wrong. Surface streaks. Brittleness. Sink marks. Inconsistent dimensions. The question that always follows is the same one: where did this come from?
Injection molding defects rarely announce their root cause. A splay mark looks like a processing problem. A brittle part looks like a material problem. Inconsistent dimensions look like a tooling problem. But many of them can trace back to something processors overlook: moisture in the resin that never got fully removed.
This guide walks through the most common injection molding defects, what causes each one, and — critically — which ones trace back to the drying step that most processors overlook until something goes wrong.

Before We Talk About the Dryer: Incoming Resin Moisture Matters
One of the most overlooked variables in injection molding defect troubleshooting is the condition of the resin before it ever reaches the dryer.
Hygroscopic resins absorb moisture from the atmosphere continuously — from the moment the bag or Gaylord is opened. Resin stored in sealed bags in a climate-controlled environment arrives in significantly better condition than resin that’s been sitting in an open Gaylord on a humid summer production floor. The difference in incoming moisture content between those two scenarios can be substantial.
This matters because most operations dry resin on a fixed time cycle — the same drying time in January as in July, whether the incoming resin is bone dry or carrying elevated moisture from high ambient humidity. A fixed drying schedule is a blunt instrument. It may be adequate under ideal conditions and completely insufficient under real-world ones. Processors who experience seasonal defect patterns — problems that appear in summer and disappear in winter — are often looking at an incoming moisture problem that their fixed drying schedule can’t compensate for.
The starting point matters. A dryer working with properly stored, low-moisture incoming resin has a very different job than one working with resin that’s been sitting open in high humidity. Neither situation will necessarily show up as an obvious alarm on your equipment.
Why Your Dew Point Reading May Be Misleading You
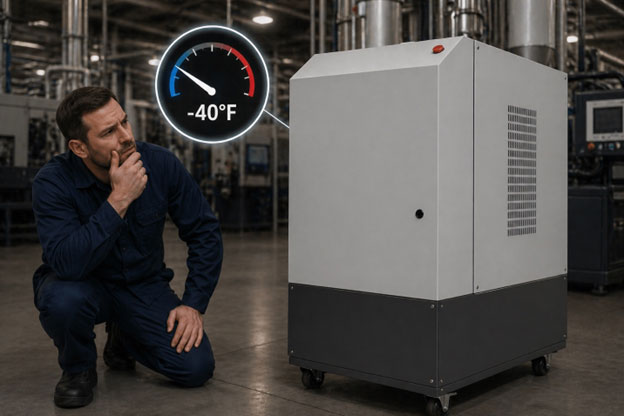
Most processors treat dew point as the primary confirmation that their resin is properly dried. If the gauge reads -40°F, the assumption is that drying is working. That assumption deserves a closer look.
A good dew point number at the inlet does not guarantee that every pellet in the hopper is actually dry. Dew point measures the condition of the incoming process air — not what’s happening inside the resin bed. Airflow distribution, hopper design, and whether heat is consistently reaching every pellet at every level are what actually determine drying performance at the pellet level.
A dryer with insufficient airflow may show a perfectly acceptable dew point reading while failing to penetrate the resin bed adequately. A single-flow hopper may deliver excellent dew point air at the base while the upper resin bed runs cold — leaving pellets in that upper zone under-dried regardless of what the gauge reads. Dew point at the inlet and actual moisture content of every pellet leaving the hopper are two very different things.
This is not an argument against monitoring dew point — consistency matters and dramatic dew point variation is a real signal worth acting on. But dew point alone is not a complete picture of dryer performance. Processors who are hitting their dew point targets and still seeing moisture-related defects are often dealing with a hopper design or airflow problem, not a dew point problem. Not all dryers deliver the same drying performance even when running the same dew point settings.
Splay (Silver Streaks)
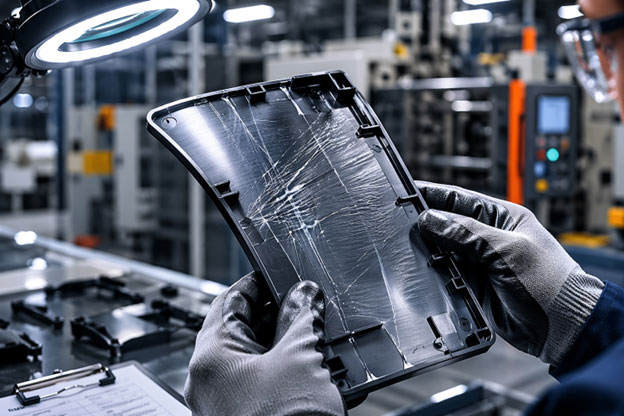
Splay is one of the most recognizable defects in injection molded parts — silver or white streaks that appear on the surface, often fanning out from the gate area or running lengthwise along the part. It’s also one of the most misdiagnosed.
What it looks like: Silvery streaks, lines, or a frost-like surface appearance on an otherwise smooth part. Sometimes described as “silver streaks” or surface marks that don’t match the intended finish.
What causes it:
The most common cause of splay is moisture — specifically, moisture in the resin that flashes to steam during injection. When wet resin enters the hot barrel, water trapped inside pellets vaporizes violently and gets pulled along the melt flow, leaving the characteristic streaking pattern on the surface. It’s essentially water damage that happens in fractions of a second inside the mold.
Here’s what’s often actually happening: the dryer appears to be working correctly: the dew point gauge reads fine, the temperature settings are unchanged, but the upper portion of the hopper is running cold. Heated dry air enters at the base and loses heat as it rises through the dense resin bed. By the time it reaches the upper half of the hopper, it’s too cool to drive moisture from inside the pellet to the surface. Those pellets look dry. They’re not.
Low-airflow dryers compound this problem further. Insufficient air velocity through the resin bed means heat and dry air never adequately penetrate to every pellet — even when the dew point at the inlet looks acceptable. Not all dryers deliver the same results, even running the same settings.
Other contributors to splay include degraded material, trapped air or gas in the melt, and certain resin-colorant incompatibilities. But moisture from inadequate drying — whether from a cold upper hopper, insufficient airflow, or incoming resin that arrived wetter than expected — is among the most common root causes.
What to check first: Don’t rely solely on dew point as confirmation of proper drying. Verify that heat is reaching the entire hopper — not just the bottom half. Check whether your dryer’s airflow is adequate to penetrate the resin bed uniformly. And consider whether incoming resin moisture or storage conditions may be a contributing factor.
Brittleness
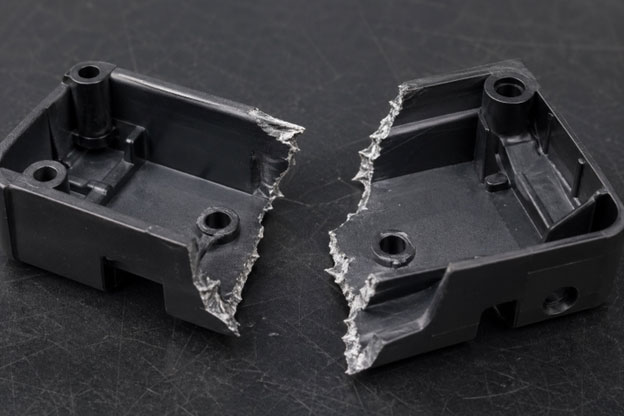
A part that breaks under stress it was designed to handle is a serious problem — whether it fails in the customer’s hands or during your own quality inspection. Brittleness is one of the most damaging defects because it can be invisible until the part fails.
What it looks like: Parts that crack, snap, or shatter under loads they should be able to handle. May not show any visual defect before failure.
What causes it:
Moisture is, again, a frequent culprit. Many engineering resins — nylon, polycarbonate, ABS, PET — are hygroscopic. When those resins are processed wet, water molecules can attack polymer chains at the molecular level through a process called hydrolytic degradation. The chemical bonds between polymer chains are broken — and once that happens, the material’s mechanical properties are permanently compromised. No amount of post-processing brings them back.
The same hopper design problem that causes splay can cause brittleness — pellets in the upper resin bed that never reached the temperature needed for moisture to fully migrate out. The difference is that splay is visible immediately while brittleness may not surface until the part is in service.
Over-drying can also cause brittleness in certain materials, particularly those sensitive to heat or prolonged drying times. Fixed drying schedules that don’t account for actual incoming moisture levels can result in over-drying some batches while under-drying others — neither outcome is acceptable for engineering resins.
What to check first: Review your drying schedule against actual conditions, not just standard settings. Consider whether incoming resin storage conditions may be contributing. If brittleness appears seasonally or inconsistently, incoming moisture variation is worth investigating before adjusting process parameters.
Sink Marks
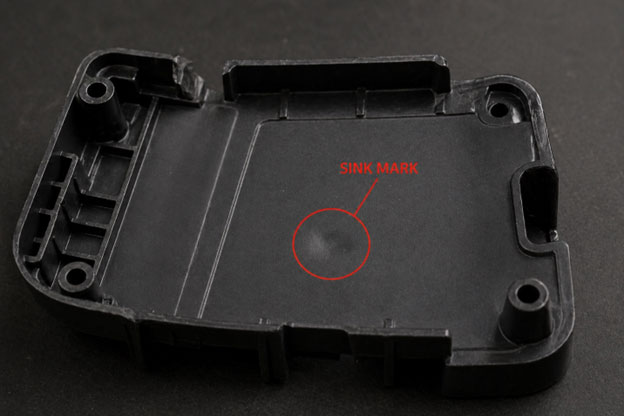
Sink marks are depressions or dimples on the surface of a part, typically appearing on the opposite side from a rib, boss, or thick wall section.
What it looks like: Shallow indentations, dimples, or depressions on an otherwise smooth surface. Most commonly found on flat or curved faces opposite thick sections.
What causes it:
Sink marks are primarily a cooling and geometry problem. When material in a thick section cools more slowly than surrounding areas, it contracts as it solidifies — and if there isn’t enough material to compensate for that contraction, the surface pulls inward.
Contributing factors include part wall thickness inconsistency, gate location, insufficient packing, and cooling system imbalances. Moisture is less commonly the direct cause of sink marks, though improper drying affecting melt viscosity can influence how material packs out.
What to check first: Review wall thickness consistency in the problem area. Examine gate placement and cooling channel uniformity.
Weld Lines (Knit Lines)
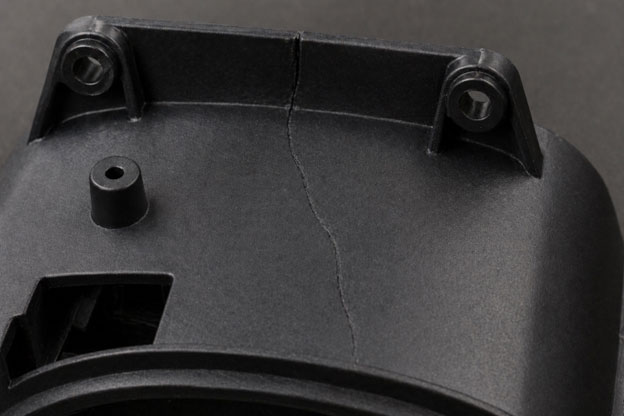
Weld lines form wherever two flow fronts meet inside the mold — at the other side of a hole, past an insert, or where converging flows from multiple gates rejoin.
What it looks like: A visible seam or line running across the part surface. Under stress, weld lines can be failure initiation points even when they’re not visually obvious.
What causes it:
Weld lines are fundamentally a flow-front issue. When two melt fronts converge, they need sufficient heat to fully bond. If the melt is too cool or the fronts arrive at too steep an angle, the bond is incomplete.
Moisture can contribute indirectly — wet resin creates steam that interferes with melt flow and reduces the temperature at which weld lines form, weakening the bond. Inconsistently dried resin introduces variability in melt behavior that makes weld line strength unpredictable from shot to shot.
What to check first: Gate location and mold design are primary levers. If weld lines appear inconsistently with no process changes, variable resin condition — including moisture from inconsistent drying — is worth investigating.
Warpage and Dimensional Inconsistency
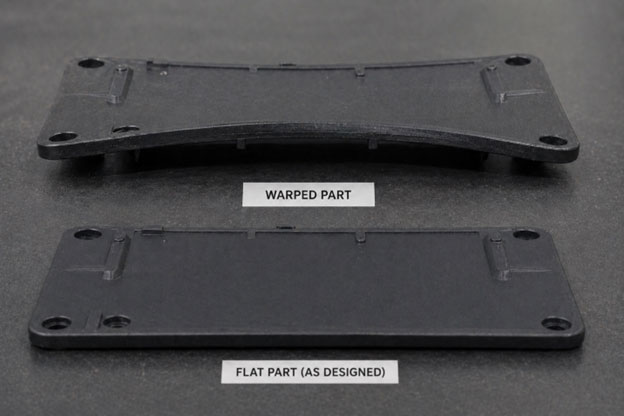
A part that’s dimensionally correct on Tuesday and out of spec on Wednesday, with no obvious process changes, is one of the more frustrating problems in injection molding. Warpage — distortion of the part from its intended shape — and dimensional drift both fall into this category.
What it looks like: Parts that don’t lay flat, don’t fit their mating components, or show dimension variation from run to run even when process settings appear unchanged.
What causes it:
Inconsistent material condition is a major contributor that processors often underestimate. When resin enters the barrel with inconsistent moisture content — some pellets well-dried, others still holding internal moisture — the melt behaves differently from shot to shot. Viscosity varies. Shrink rates vary. And the parts that come out reflect that variation.
Many times this is the consistent pellet rheology problem. If every pellet arriving at the machine isn’t at the same moisture content and the same temperature, you’re essentially processing a different material from shot to shot — even though the resin bag says the same thing on the label. And a fixed drying schedule that doesn’t account for seasonal incoming moisture variation makes this worse — the resin condition arriving at your machine in August may be meaningfully different from what arrives in February, even from the same supplier
Tooling, cooling imbalances, and material orientation all contribute to warpage as well. But processors who are fighting dimensional inconsistency they can’t explain through tooling or cooling often find that addressing drying consistency solves the problem — or at least removes it as a variable so the actual root cause becomes easier to isolate.
What to check first: If dimensional inconsistency appears seasonally or after a resin lot change, incoming moisture and storage conditions are the first things to evaluate. Verify that your dryer is delivering consistent drying throughout the entire hopper, not just at the inlet.
Flash
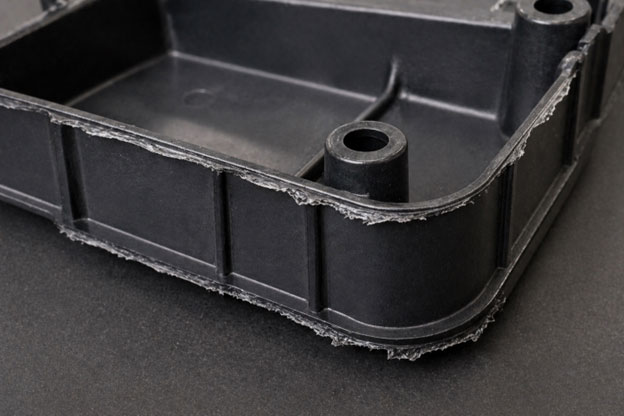
Flash is excess material that escapes the mold cavity through the parting line, vents, or ejector pin locations, creating thin fins of plastic on the part exterior.
What it looks like: Thin sheets or fins of plastic protruding from parting lines or other mold features. Can range from barely visible to significant excess material requiring manual trimming.
What causes it:
Flash is most commonly a clamping force, tooling condition, or viscosity problem. Worn tooling with parting line damage, insufficient clamping force to hold the mold closed against injection pressure, or a melt that’s too thin (low viscosity) and flows into gaps it shouldn’t all contribute to flash.
Moisture can indirectly contribute by affecting melt viscosity — a wetter-than-expected material may flow more readily into small gaps. But flash is generally more directly tied to tooling condition and process parameters than to drying.
What to check first: Inspect parting line condition. Verify clamping force is adequate. Review melt temperature — if material is running hotter than intended, viscosity drops and flash risk increases.
Short Shots
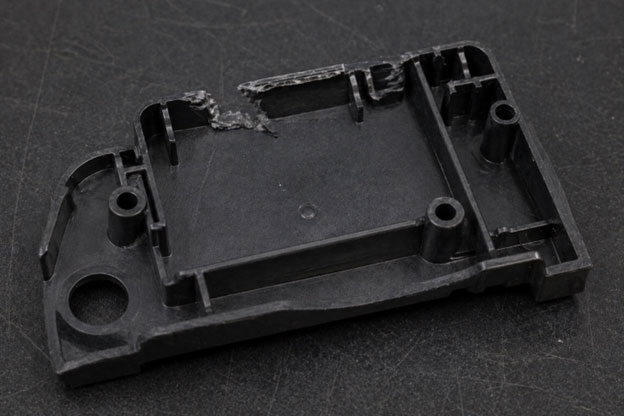
A short shot is an incomplete part — the mold cavity didn’t fill completely, leaving a section of the part missing or hollow.
What it looks like: Parts with missing sections, thin areas, or unfilled features. The defect is obvious — the part simply isn’t complete.
What causes it:
Short shots are typically a fill problem: insufficient material volume, insufficient pressure to push material through the flow path, material that’s too viscous to fill thin sections before it freezes off, or venting problems that trap air and prevent material from reaching certain areas.
Over-dried or degraded material with higher-than-expected viscosity can contribute to short shots by making it harder to fill thin-walled sections. Gas generation from wet material can also displace melt and prevent proper filling in certain configurations.
What to check first: Shot size, injection speed, and material temperature are primary adjustments. If short shots appear with a new lot of material, check incoming moisture — resin condition affects viscosity and fill behavior.
Burn Marks
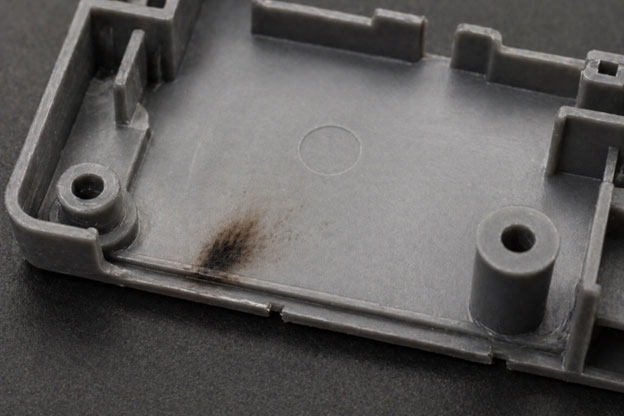
Burn marks appear as brown or black discoloration, typically at the end of flow paths or in areas where air gets trapped.
What it looks like: Dark brown or black discoloration, often at weld line locations, flow path ends, or areas with inadequate venting.
What causes it:
Burn marks are usually a gas/air trapping problem. As material fills the mold, it compresses trapped air ahead of the flow front. If that air can’t escape through vents, it gets compressed rapidly — and that compression generates enough heat to scorch the material at the point of contact.
Material degradation from excessive residence time or temperature also produces similar discoloration. Certain additives and colorants can degrade under heat, creating localized burn-like marks that aren’t from trapped air.
What to check first: Vent location and condition are primary. Injection speed (slowing down allows more time for air to escape) and melt temperature (lower temperatures reduce scorch risk) are process levers.
Black Specks and Contamination
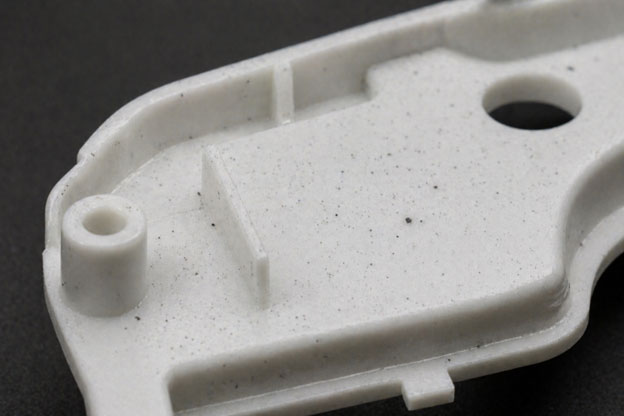
Black specks or foreign particles in parts are particularly damaging for medical, cleanroom, and optical applications — but they’re a problem anywhere part appearance or cleanliness matters.
What it looks like: Small dark specks, flecks, or particles visible in the molded part.
What causes it:
Black specks in injection molded parts have several common sources — and they’re worth distinguishing because the fix is different for each one.
Desiccant dust. Traditional desiccant bead dryers use loose desiccant beads that degrade over time. As they break down, they shed particles and dust into the process air stream. That dust travels with the process air into the hopper and can contaminate resin — and eventually parts. This contamination pathway is invisible in normal operation. The dryer appears to be working. Dew points look normal. There’s no alarm. The contamination happens gradually as beads degrade and typically shows up first as occasional specks that are difficult to trace to a specific source.
Resin fines from high-velocity conveying. When resin pellets are conveyed at excessive velocity through pneumatic conveying lines, they degrade — pellets impact the line walls, elbows, and each other, generating fine particles and dust smaller than the pellet itself. Those fines travel with the material into the hopper and dryer. At the barrel, the processing temperature is calibrated for full-size pellets — but those smaller particles reach that temperature much faster and burn before the surrounding material has fully melted. The result is black specks distributed through the parts with no obvious upstream cause.
Regrind and other contamination sources. Degraded regrind with excessive fines content, colorant incompatibilities, barrel contamination from a previous material, and foreign material introduced earlier in the handling process can all produce similar-looking specks. Each has a different root cause and a different solution.
What to check first and how to address it:
If the source is desiccant dust: The most reliable fix is a drying technology that uses no loose desiccant of any kind. A permanently sealed desiccating cartridge eliminates the degradation pathway entirely — there are no beads to break down and no dust to shed into the process air. For higher throughputs, an advanced desiccant wheel with a molecular sieve zeolite desiccant honeycomb impregnated directly onto the wheel achieves similar results — no loose beads, no degradation, no desiccant dust.
If the source is conveying fines: Reduce conveying velocity. Pumps equipped with variable frequency drives allow precise velocity control, keeping material moving efficiently through the line without the impact degradation that generates fines. Properly designed conveying systems for the material being run are worth evaluating if fines generation is a persistent problem.
If the source is airborne fines in the drying system: A cyclone dust collector positioned at the dryer inlet filters out fine particles before they enter the drying process — removing the contamination pathway before it ever reaches the hopper or the machine.
In practice, black specks can often come from more than one source simultaneously. Addressing all three — desiccant medium condition, conveying velocity, and filtration — gives the most complete solution.
The Pattern Worth Recognizing
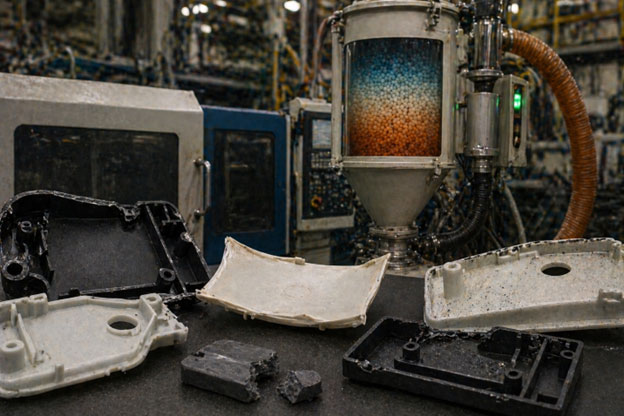
Read through that list carefully and a pattern emerges. Splay, brittleness, dimensional inconsistency, and contamination — four of the most common and most costly injection molding defects — frequently trace back to moisture in the resin and problems with the drying process.
But the important nuance is this: a good dew point reading does not mean your resin is properly dried. Dew point at the inlet is only one variable. Airflow distribution, hopper design, incoming resin moisture, and drying schedule flexibility all determine whether every pellet in the hopper actually reaches the condition it needs to. Not all dryers deliver the same performance — even running the same dew point settings.
The variables that most often go unexamined are:
Hopper design. Single-flow hoppers frequently leave the upper resin bed cold regardless of what the dew point gauge reads. Pellets in that upper zone may never receive the sustained heat required for internal moisture to migrate out. The dryer looks fine. The resin may not be.
Incoming resin moisture. Resin stored in open Gaylords on a humid production floor arrives in a very different condition than sealed resin in a climate-controlled environment. A fixed drying schedule that works in January may be inadequate in July.
Desiccant degradation. Bead-based desiccant loses performance gradually and silently. Dew points drift. The gauge still reads acceptable. The resin may not be as dry as it appears.
Low airflow. A dryer with insufficient airflow may show acceptable dew points while failing to penetrate the resin bed adequately — leaving pellets under-dried despite what the instruments indicate.

How to Address the Root Cause
The starting point is to look beyond dew point as the primary indicator of drying performance. Verify that your dryer is delivering consistent heat and airflow throughout the entire hopper — not just at the inlet. Consider whether incoming resin storage conditions and seasonal humidity variation may be contributing to inconsistency. And evaluate whether your drying schedule is flexible enough to account for actual incoming moisture rather than a fixed standard setting applied regardless of conditions.
If you’re fighting splay, brittleness, or contamination that you can’t trace to a tooling or processing root cause, the dryer is a logical next place to look. And specifically — the hopper design, the desiccant medium condition, and the airflow distribution are the right things to evaluate, not just the dew point reading.
Novatec makes two dryers built specifically to address these root causes. For machine-side and portable drying up to 100 lbs/hr, the NovaDrier is a Desiccating Cartridge Dryer featuring the industry’s only Lifetime Desiccating Cartridge — eliminating the performance inconsistency caused by degraded desiccant medium and guaranteeing zero desiccant dust for the life of the dryer — and patented Dual Drying Zones that eliminate the cold upper hopper problem permanently, ensuring every pellet at every level receives consistent heat and dry air from the moment it enters the hopper. Together they guarantee consistent pellet rheology at the machine, consistent melt behavior, and consistent part quality — every run. For central drying systems and high-volume production up to 5,000 lbs/hr, the NovaWheel is the industry’s most advanced desiccant wheel dryer, built around a molecular sieve zeolite desiccant honeycomb impregnated directly onto the wheel — no loose beads, no desiccant dust, no degradation — delivering continuous ultra-low dew points with up to 15 years of wheel life.
If you’re chasing a defect you can’t explain through tooling or process parameters, the dryer is worth a close look. More often than not, that’s where the answer is.
Curious whether your drying setup is contributing to defects? Give us a holler on the form below — no sales pitch, no pressure — just a conversation about what’s happening in your operation.
Ask The Expert
"*" indicates required fields
Frequently Asked Questions
Why do I get black specks in molded parts?
Black specks have several sources with different fixes. Degrading desiccant beads can shed dust into the process air and resin. Pellets conveyed at excessive velocity break into fines that burn in the barrel before the surrounding material melts. Degraded regrind, colorant incompatibilities and barrel contamination from a previous material produce similar specks, often more than one at once.
Can wet resin cause brittle parts?
Yes. Hygroscopic resins such as nylon, polycarbonate, ABS and PET processed wet undergo hydrolytic degradation: water breaks the bonds between polymer chains and permanently reduces mechanical properties. Unlike splay, brittleness may not show until the part is in service. Over-drying can also cause brittleness in heat-sensitive materials, so fixed schedules can over-dry some batches and under-dry others.
Why do molding defects get worse in summer?
Hygroscopic resin absorbs moisture from the air once a bag or Gaylord is opened, and resin sitting open on a humid summer floor reaches the dryer much wetter than sealed resin in climate-controlled storage. Most operations dry on a fixed time cycle year-round, so a schedule that works in January may be inadequate in July.
About the Authors

Vice President of Moisture & Drying Technologies, Novatec
Mark Haynie has designed and installed resin drying systems for more than 40 years, working in thousands of plastics plants across the industry. As Novatec’s Vice President of Moisture & Drying Technologies, he leads the company’s drying technology group, including its work on moisture measurement and predictive drying. He also serves as a technical reviewer for Novatec’s Drying Knowledge Center and has authored numerous technical articles and whitepapers on resin drying and moisture.
Mark earned a Bachelor of Science in Chemical Engineering from Virginia Tech.
Through Novatec’s Ask the Expert program, Mark regularly helps processors troubleshoot drying performance and resin-moisture challenges.

Technology Manager, Novatec
Joshua Belisle is Technology Manager at Novatec, where his work focuses on simulation and technology development for resin drying. He earned a B.S. in Mechanical Engineering with a minor in Engineering Business from the University of Virginia in 2023 and joined Novatec that same year. Joshua uses simulation tools to investigate previously difficult-to-measure aspects of the drying process, helping Novatec better understand airflow, heat transfer and other variables that influence resin-drying performance.
Related Articles

Review how aging desiccant beads produce dust and why contamination adds maintenance, rework and scrap.

Review heater, airflow, filter and desiccant maintenance to keep resin drying equipment working properly.

Learn what dew point measures in drying air and how desiccant, filters and airflow affect dryer performance.
Ask the Expert